
Bathroom Wall Panels: Materials, Installation, Costs, and Planning
Bathroom Wall Panels Guide Index
- Bathroom Wall Panels Overview
- When Should Bathroom Wall Panels Be Installed
- What Types of Bathroom Wall Panels Are Available
- How Do Room Size and Layout Affect Wall Panel Choices
- What Materials and Components Are Used in Wall Panel Installation
- What Upgrades Can Be Added With Bathroom Wall Panels
- What Installation Details Matter in Wall Panel Work
- What Affects Bathroom Wall Panel Cost
- What Mistakes Should Homeowners Avoid With Wall Panels
- How Should You Plan Bathroom Wall Panel Installation
- Related Bathroom Wall Panel Topics
- Frequently Asked Questions About Bathroom Wall Panels
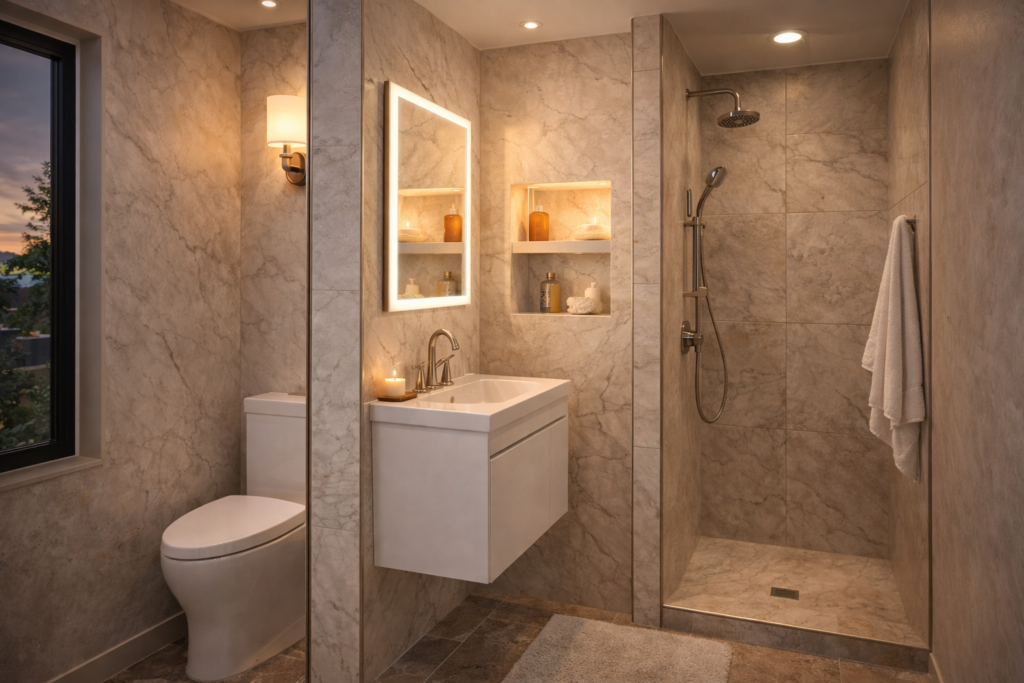
Bathroom Wall Panels Overview
Bathroom wall panels offer an alternative to traditional tile, providing a seamless, waterproof surface that covers large areas quickly. Unlike individual tiles with grout lines every few inches, panels come in sheets that span from floor to ceiling or across entire walls. This changes both the visual look and the maintenance requirements of the bathroom.
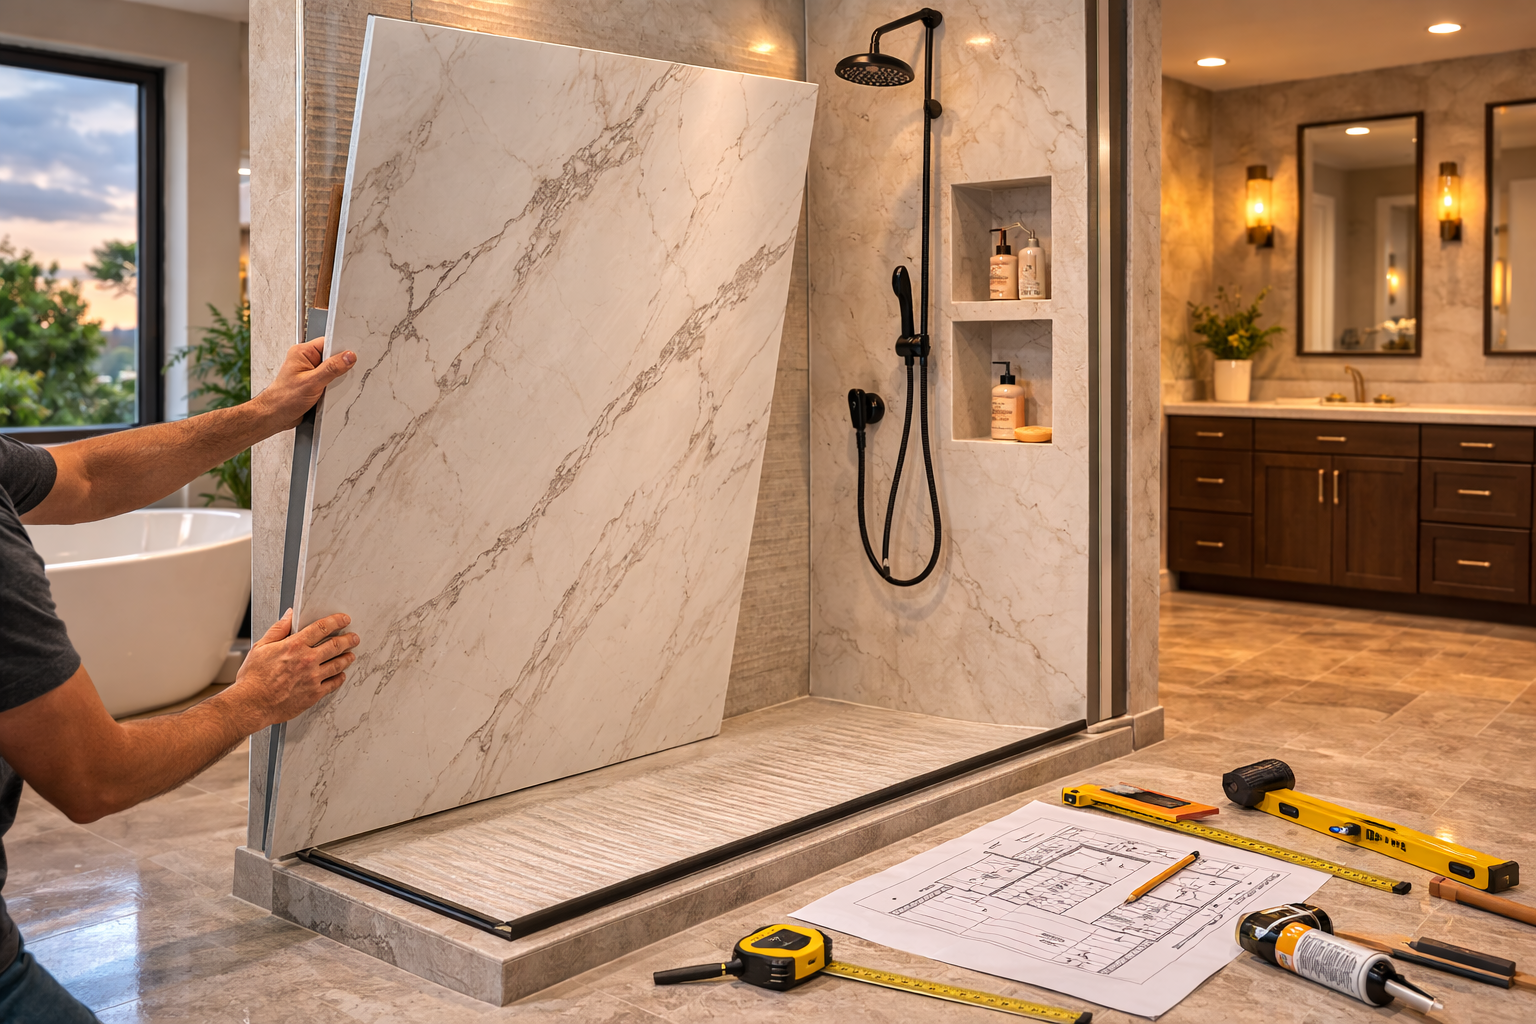
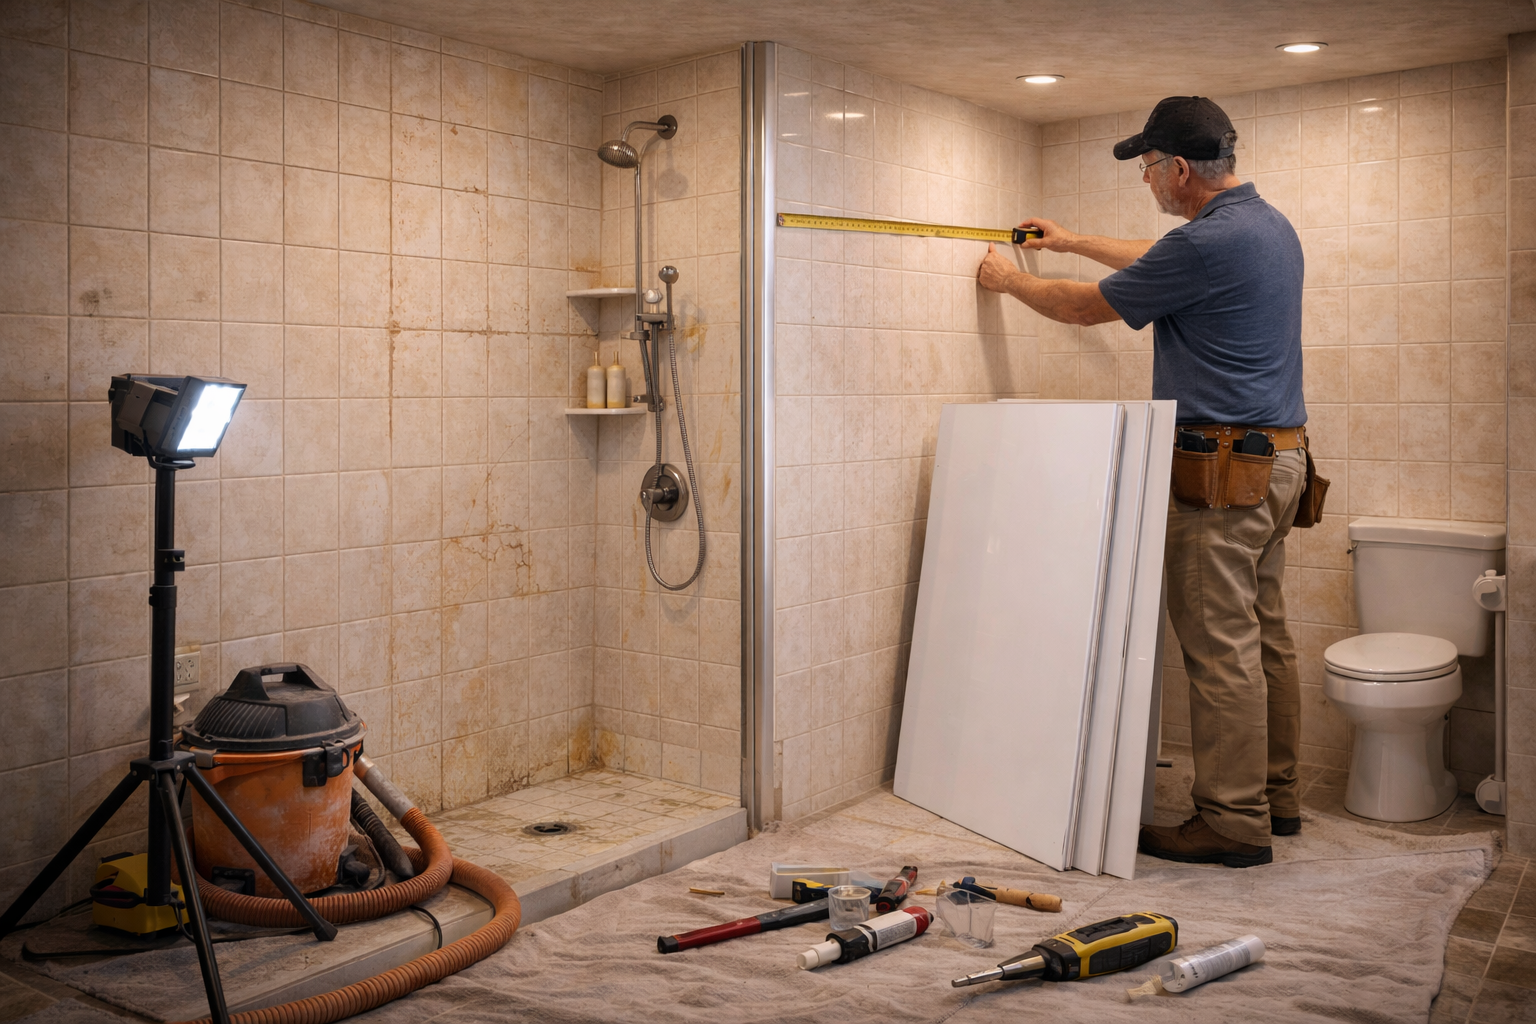
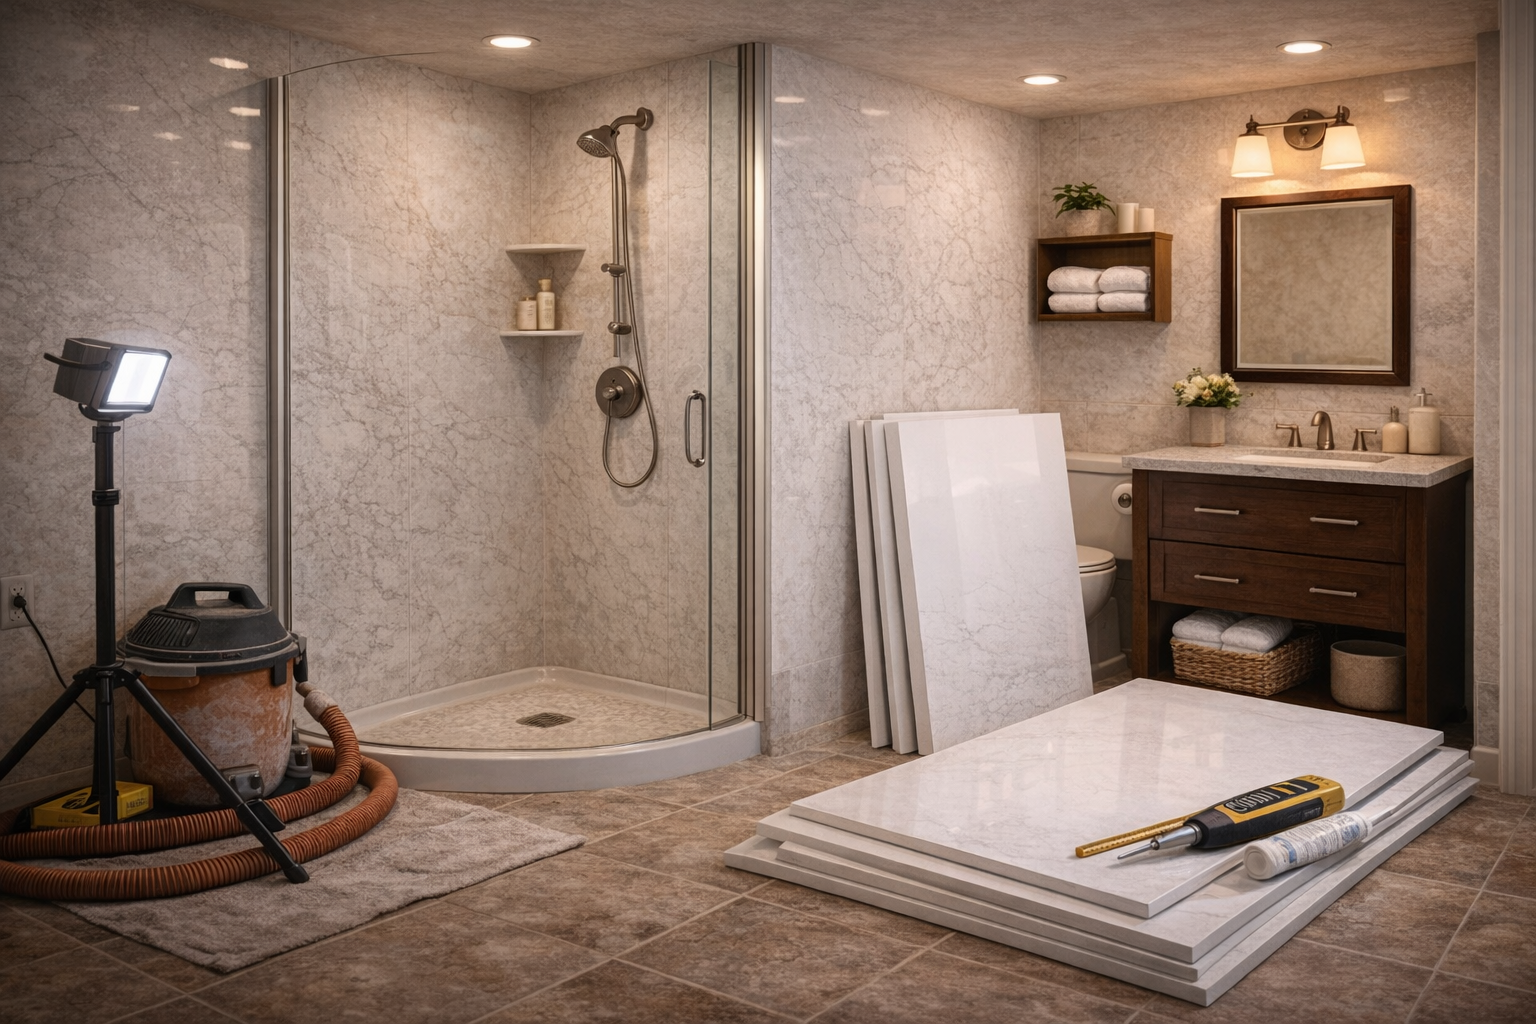
In practical remodel work, wall panel installation involves more than hanging sheets on the wall. It requires proper substrate preparation, precise cutting around fixtures, sealed joints at corners and edges, and attention to how panels meet the floor, ceiling, and adjacent surfaces. The panels must also accommodate plumbing penetrations, electrical boxes, and ventilation openings without compromising the waterproof barrier.
What Gets Updated During a Bathroom Wall Panel Project
The work typically includes removal of existing wall coverings, substrate repair or replacement, panel measurement and cutting, adhesive application or mechanical fastening, joint sealing with trim or caulk, and finish work around fixtures and edges. Some installations also involve upgrading the wall structure behind the panels to ensure a flat, stable surface.
What Is the Difference Between Wall Panels and Tile
Tile consists of many individual pieces set in mortar with grout joints between them. Wall panels are large-format sheets, often 4 to 8 feet wide, that create continuous surfaces. Tile allows for intricate patterns and easy replacement of damaged pieces. Panels install faster and eliminate grout maintenance but limit design flexibility and can be harder to repair if damaged. The choice depends on priorities around installation time, maintenance, appearance, and budget.
When Should Bathroom Wall Panels Be Installed
Wall panels work best in bathrooms where speed of installation matters, where grout maintenance is a concern, or where a modern, seamless look is desired. They are commonly chosen for guest bathrooms, rental properties, and full bathroom renovations where the timeline is tight.
Consider panels when the existing walls are sound but the surface finish needs replacement. If the wall structure behind is compromised by moisture damage, that damage must be addressed before panel installation. Panels can cover minor imperfections but will telegraph major substrate problems.
Panels also make sense when the bathroom layout includes large, uninterrupted wall areas. Small bathrooms with many corners, niches, and fixtures require more cutting and trimming, which reduces the efficiency advantage of panels. For broader planning considerations, it can help to review Energy Saver design guidance.
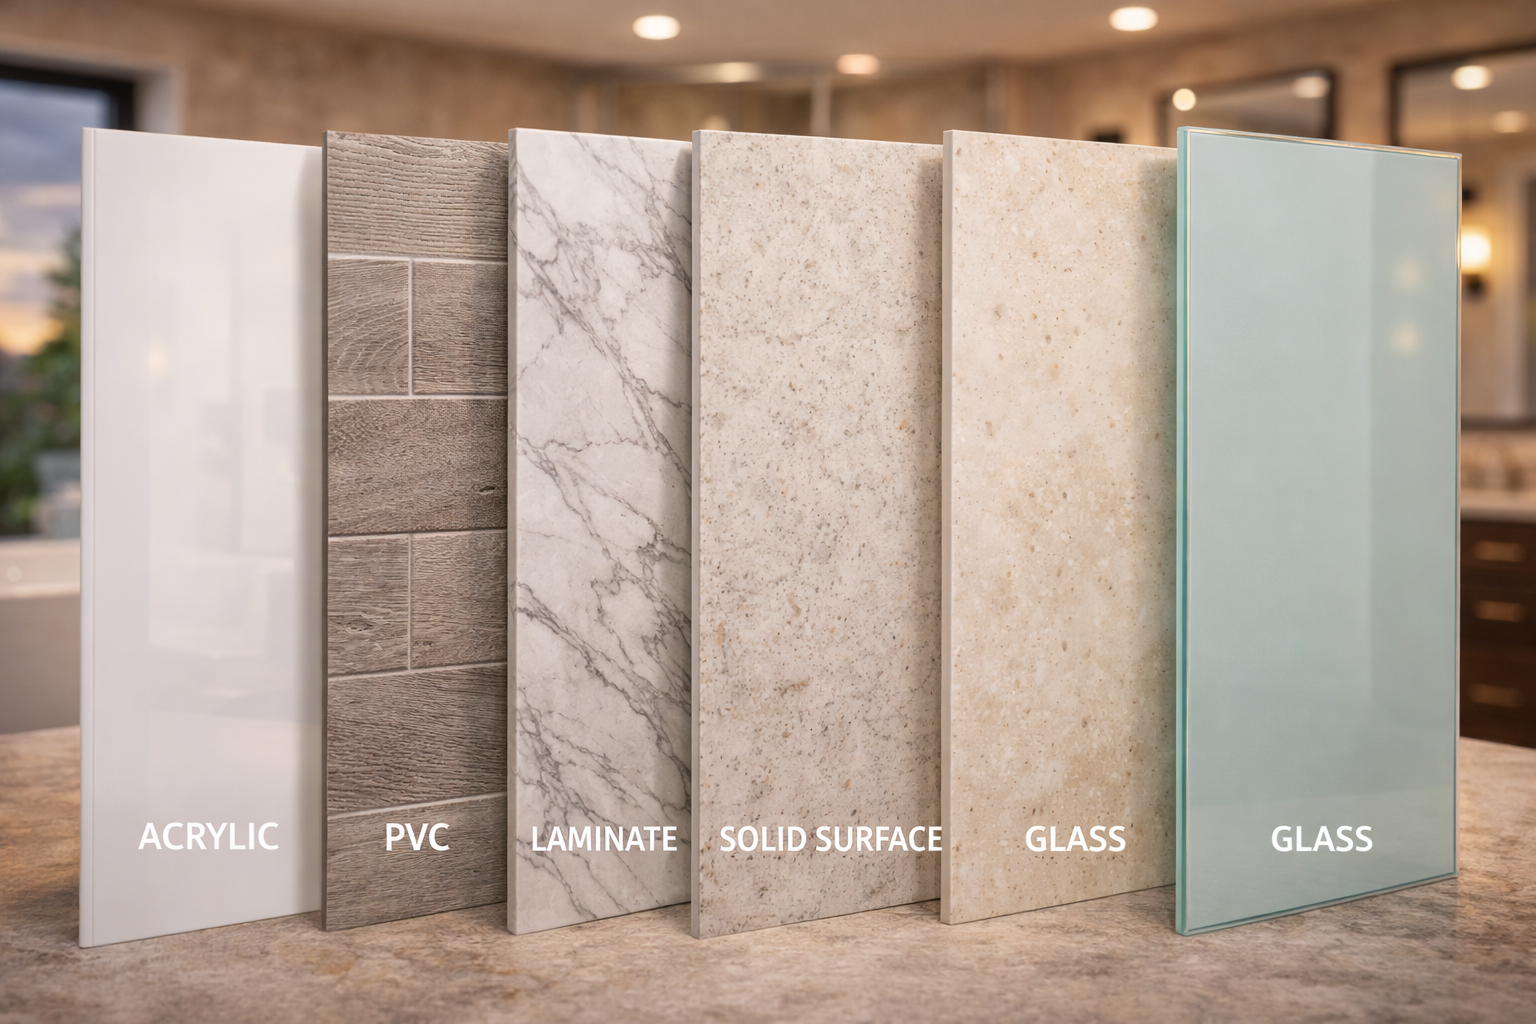
What Types of Bathroom Wall Panels Are Available
Acrylic Panels
Acrylic panels are lightweight, available in glossy or matte finishes, and come in solid colors or patterns that mimic tile or stone. They are warm to the touch and resist mold and mildew. Acrylic can scratch more easily than harder materials and may show wear in high-traffic areas over time.
PVC Panels
PVC panels are budget-friendly, lightweight, and easy to cut. They often feature printed designs that simulate tile, wood, or decorative patterns. PVC is fully waterproof and requires minimal maintenance. Lower-quality PVC can look plastic-like and may yellow or become brittle over many years.
Laminate Panels
Laminate panels consist of a decorative surface layer bonded to a substrate, often with a waterproof core. High-pressure laminate offers better durability and more realistic textures than standard laminate. These panels can closely replicate the look of stone, wood, or designer tiles at a fraction of the cost.
Solid Surface Panels
Solid surface materials like Corian or similar composites offer seamless appearance, excellent durability, and the ability to integrate sinks and countertops. These are premium options with higher material and installation costs. Scratches can be sanded out, and the material maintains its appearance for decades with proper care.
Glass and Back-Painted Glass Panels
Glass panels create reflective, modern surfaces that make bathrooms feel larger and brighter. Back-painted glass offers color options while maintaining the sleek surface. Glass requires precise installation, shows every fingerprint and water spot, and demands regular cleaning to maintain its appearance. Wall panel decisions are easier to make when they are compared within the overall direction of bathroom remodeling.
How Do Room Size and Layout Affect Wall Panel Choices
Small bathrooms benefit from light-colored panels and glossy finishes that reflect light and create visual space. Large panels with minimal joints make compact rooms feel less busy than tile with many grout lines.
Bathrooms with complex layouts, multiple corners, or many fixtures require more panel cutting and more trim pieces to cover joints. This increases installation time and material waste. In these cases, tile might be more efficient since small pieces fit around obstacles more easily. When comparing stone surfaces, it can help to review Natural Stone Institute guidance.
Ceiling height affects panel selection because standard panels come in specific lengths. Bathrooms with 9-foot or higher ceilings may need custom-sized panels or horizontal installation patterns to avoid visible seams.
What Materials and Components Are Used in Wall Panel Installation
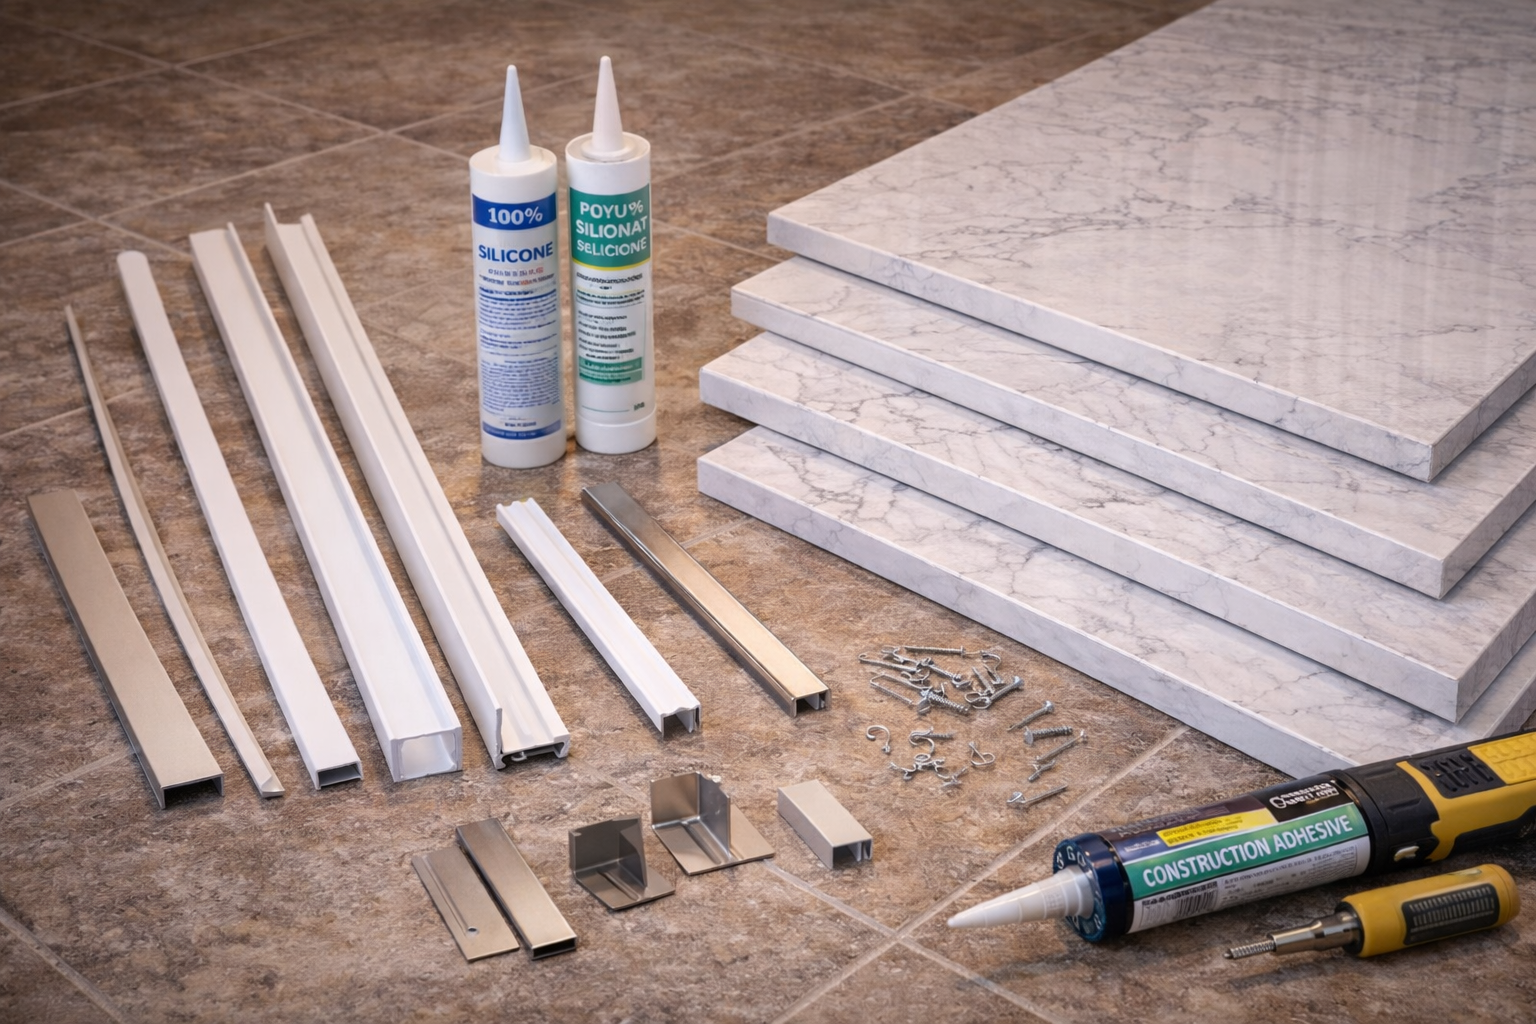
Wall panel systems include the panels themselves, adhesive or mechanical fasteners, trim pieces for edges and corners, sealant for joints, and sometimes a backing membrane for additional waterproofing. The substrate preparation may require cement board, moisture-resistant drywall, or plywood depending on the panel system and manufacturer specifications.
Trim components include inside corner pieces, outside corner pieces, edge trim, and transition strips where panels meet other materials. These trims are typically color-matched to the panels or available in metallic finishes like chrome or brushed nickel.
Sealants used with wall panels must be mold-resistant and compatible with the panel material. Silicone sealant is common, but some manufacturers specify polyurethane or other formulations. Using the wrong sealant can cause discoloration or adhesion failure.
What Upgrades Can Be Added With Bathroom Wall Panels
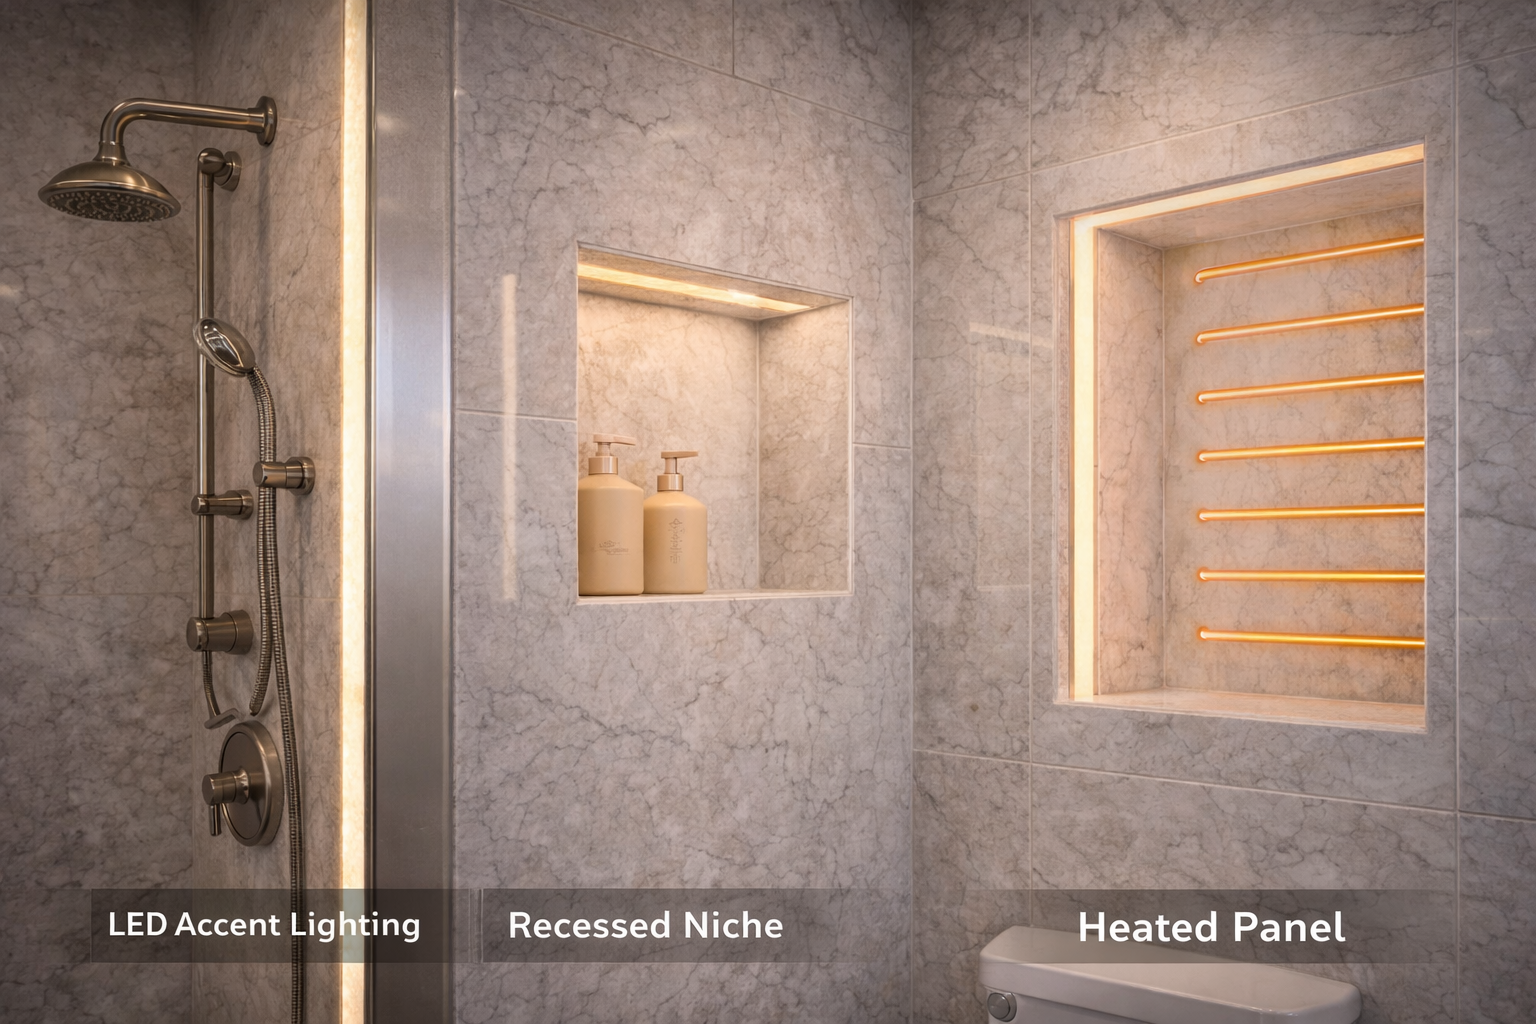
Recessed niches for shampoo and soap can be integrated into panel installations, either by using pre-formed niche units or by custom-cutting the panels to fit around built-in niches. Lighting can be added with LED strips along panel edges or behind translucent panel sections.
Heated wall systems are available with some panel types, providing warmth in addition to the visual upgrade. These systems require electrical work and must be installed according to manufacturer specifications for safety.
Accent strips, decorative trim, or contrasting panel sections can break up large wall areas and add visual interest. Some panel systems offer coordinating ceiling panels for a fully enclosed wet room appearance.
What Installation Details Matter in Wall Panel Work
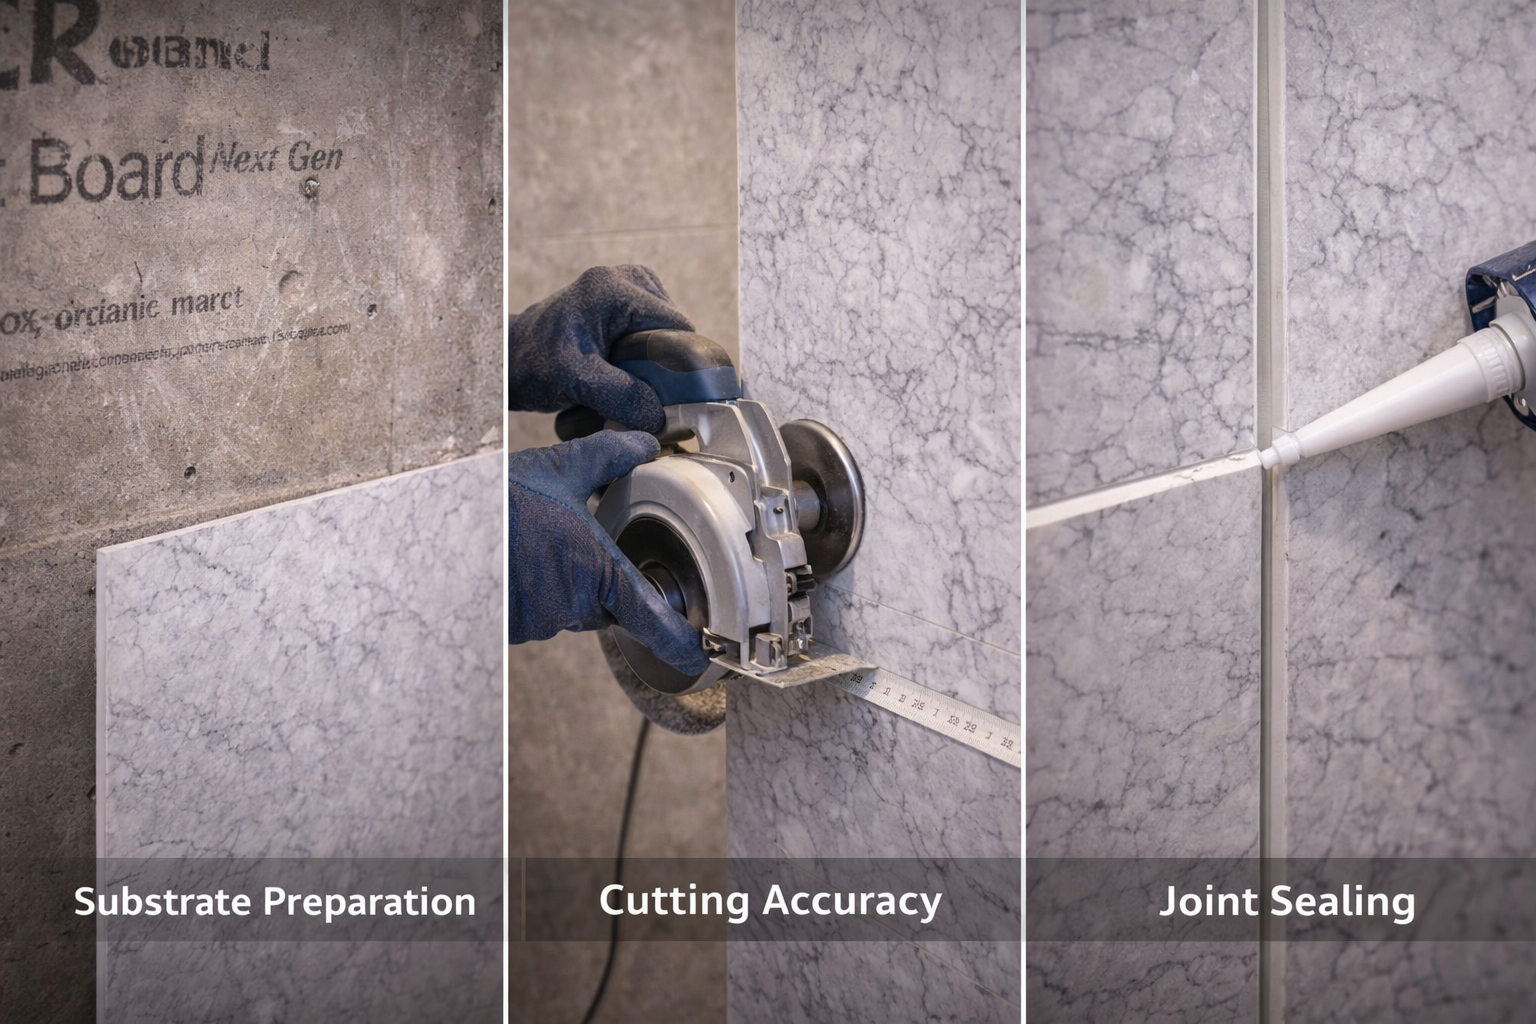
Substrate preparation determines the final appearance. Panels will show every bump, dip, or imperfection in the wall beneath them. The surface must be flat, clean, dry, and structurally sound before installation begins.
Cutting accuracy matters because panels must fit precisely around fixtures, corners, and openings. Most panels cut with standard woodworking tools, but the cuts must be clean and straight for proper joint appearance.
Expansion gaps must be left at panel edges where they meet other materials or structural elements. Panels expand and contract with temperature changes, and without proper gaps, they can buckle or separate from the wall.
Joint treatment varies by panel type. Some systems use tongue-and-groove edges that interlock. Others use trim pieces that cover the joint. The method affects both appearance and waterproofing performance.
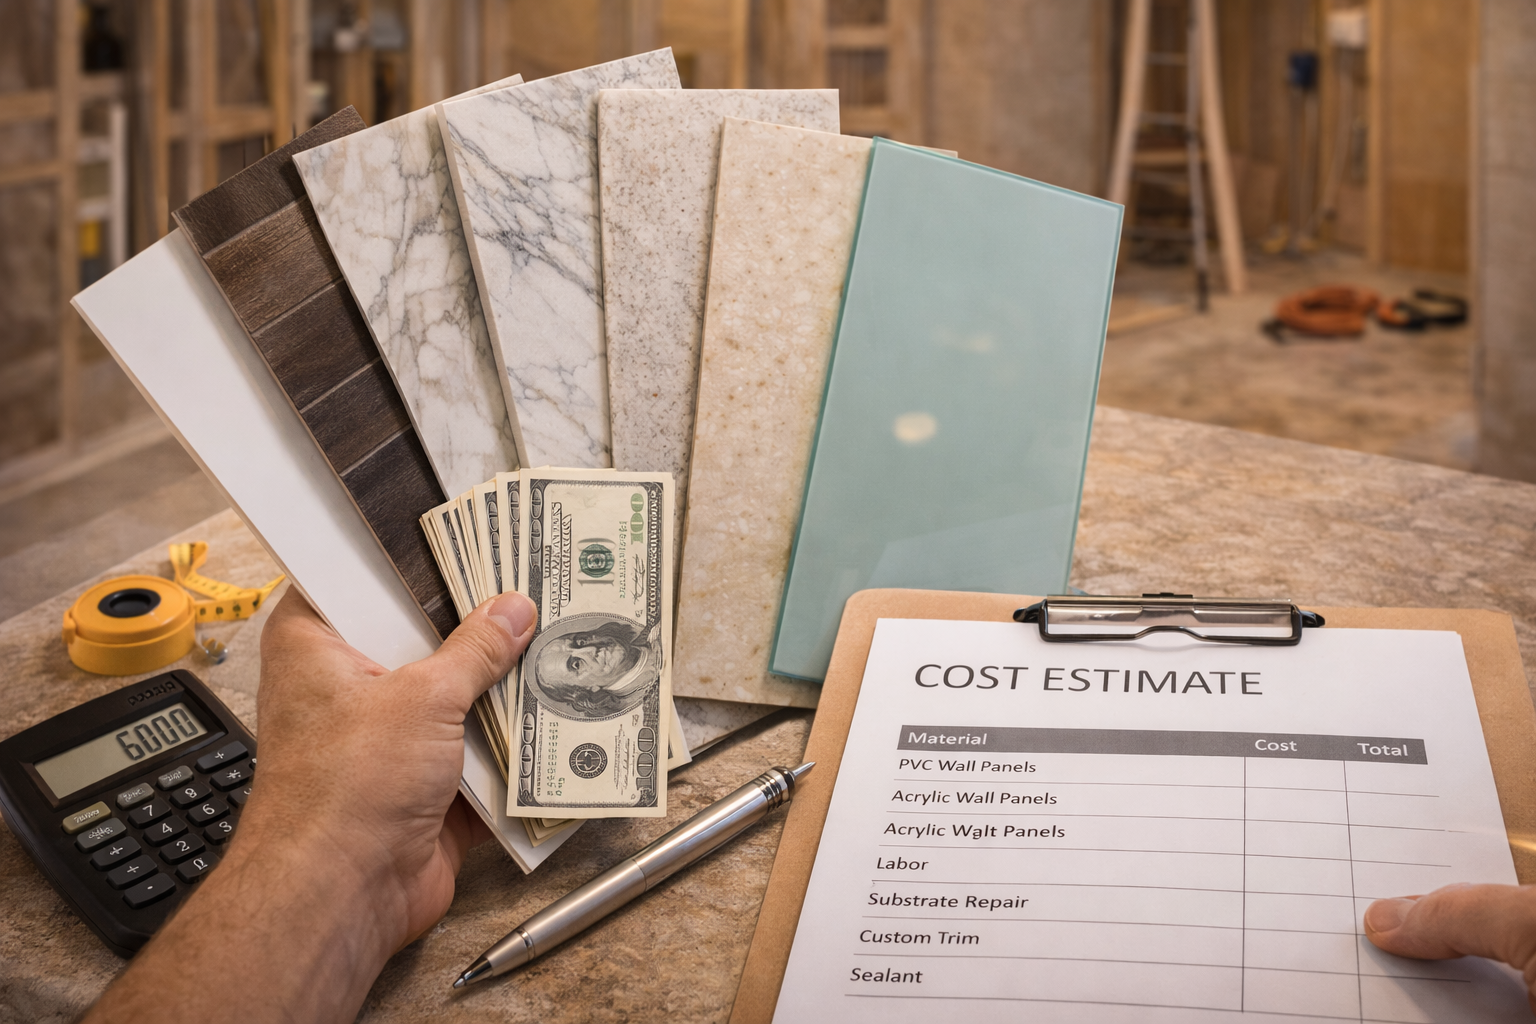
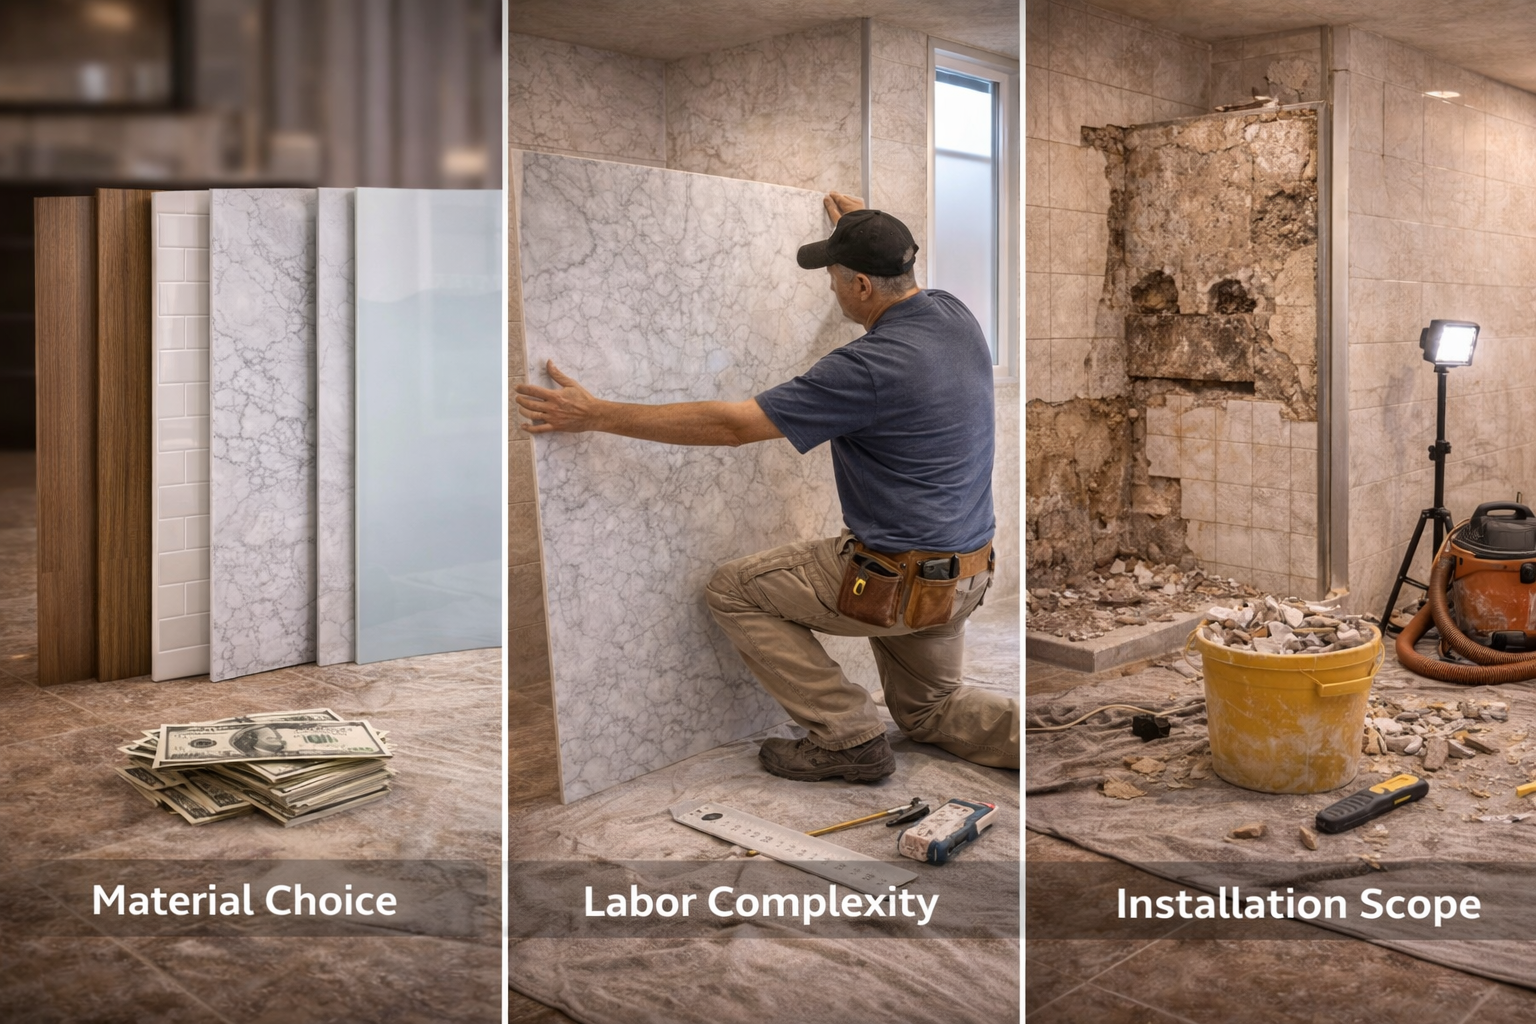
What Affects Bathroom Wall Panel Cost
Material choice is the primary cost driver. PVC panels at the low end might cost $5 to $15 per square foot. Acrylic and laminate panels range from $15 to $40 per square foot. Solid surface and glass panels can exceed $50 per square foot for materials alone.
Installation complexity affects labor costs. Simple rectangular walls with few fixtures install quickly. Bathrooms with multiple corners, windows, or elaborate fixture arrangements require more time and skill.
Substrate condition impacts cost because damaged walls must be repaired or replaced before panel installation. This adds material and labor costs that are separate from the panel work itself. During remodeling, it also helps to follow EPA indoor air quality guidance.
Trim and accessory choices add to the total. Basic PVC trim is inexpensive. Custom metal trim, integrated lighting, or specialty sealants increase costs. A full bathroom wall panel installation typically ranges from $1,500 to $6,000 depending on size, materials, and complexity.
What Mistakes Should Homeowners Avoid With Wall Panels
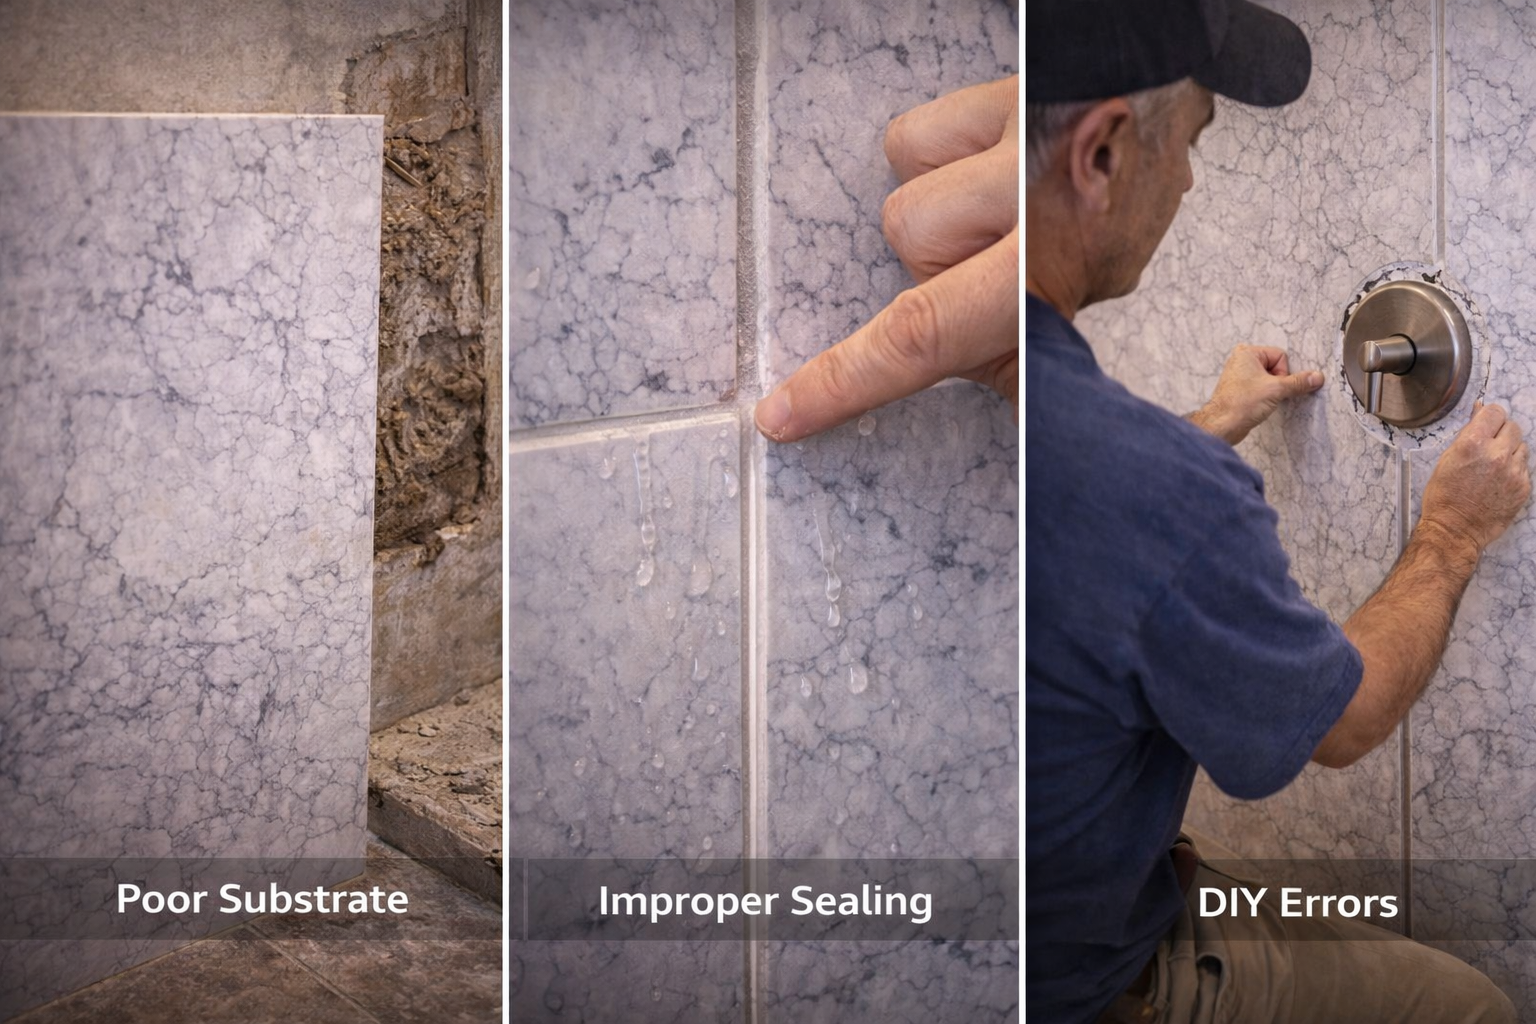
Skipping substrate preparation leads to visible imperfections and potential panel failure. Panels cannot fix underlying wall problems. Address moisture damage, structural issues, and surface irregularities before installation.
Choosing panels based only on appearance without considering the bathroom environment causes problems. High-moisture bathrooms need panels rated for wet areas. Using decorative panels not intended for showers in shower enclosures leads to water damage.
Improper joint sealing allows water penetration behind panels. Even waterproof panels fail if water gets behind them at joints, corners, or fixture penetrations. Follow manufacturer specifications for sealant type and application.
DIY installation without proper tools and experience often results in visible gaps, misaligned panels, or inadequate sealing. Wall panels require precise cutting and fitting. Mistakes are costly because damaged panels usually cannot be repaired and must be replaced.
How Should You Plan Bathroom Wall Panel Installation
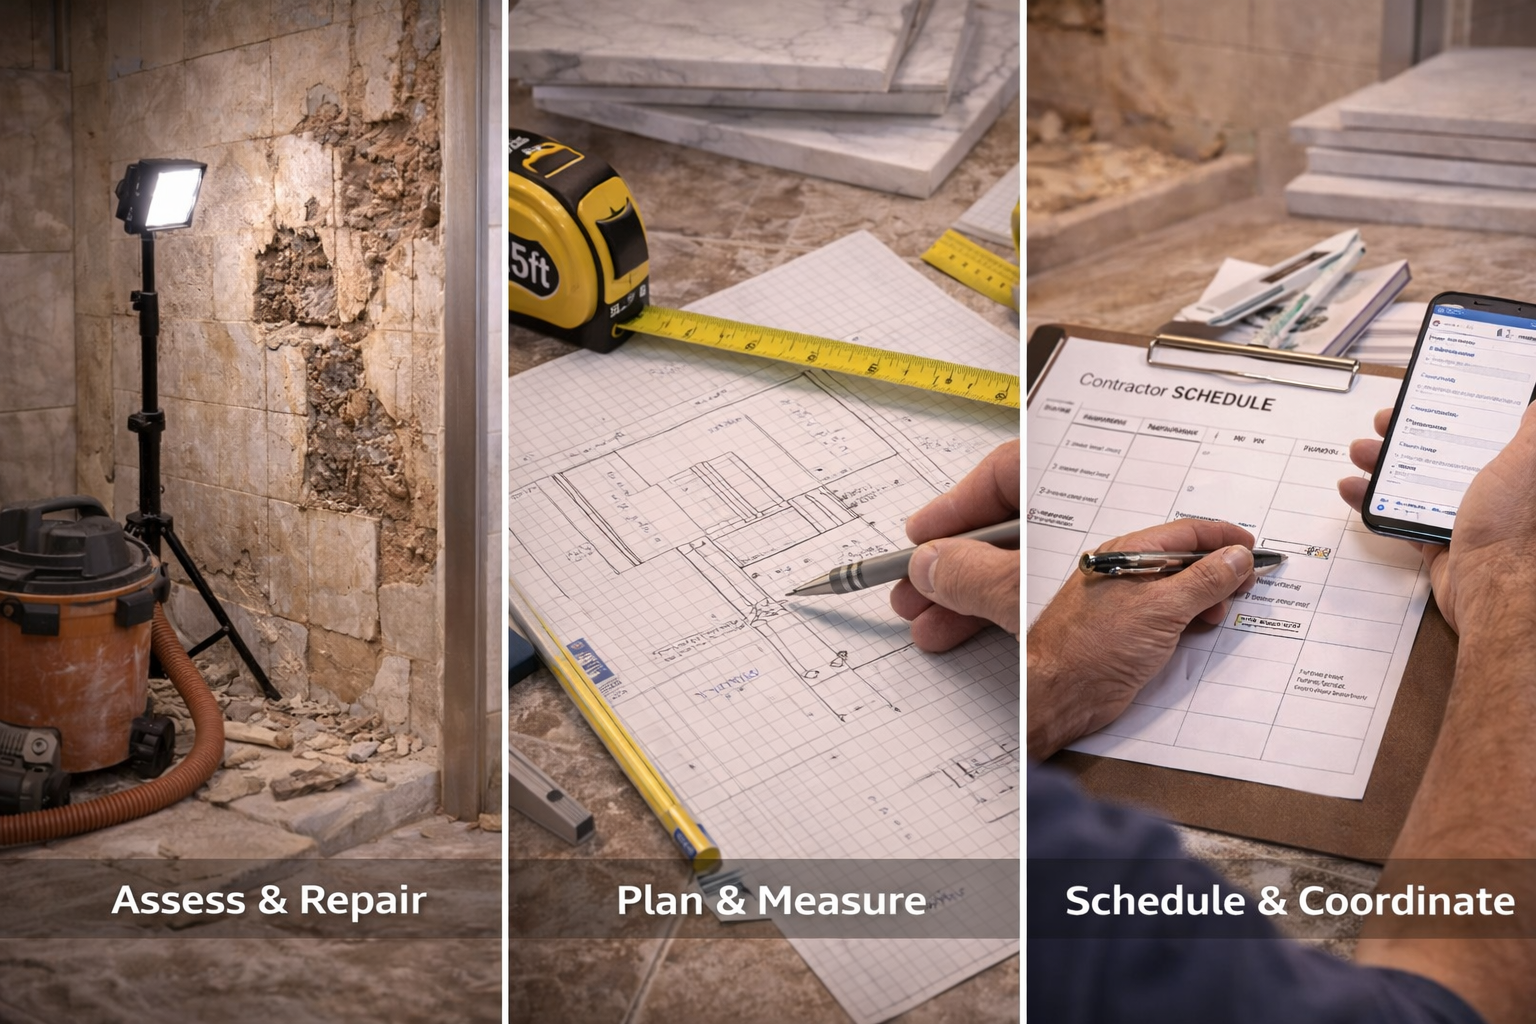
Start by assessing the existing walls for damage, moisture issues, or structural problems. Plan repairs before selecting panels because the substrate condition affects which panel systems are suitable.
Measure carefully and create a layout plan showing panel placement, joint locations, and trim requirements. Order panels with some extra material for cuts and potential mistakes. Verify that chosen panels are in stock and delivery timing aligns with your project schedule.
Coordinate panel installation with other trades. Plumbing and electrical rough-in must be complete. Fixtures should be on-site for precise fitting during panel installation. Painting and flooring typically happen after panels are installed.
Plan for proper ventilation during and after installation. Adhesives and sealants release fumes that need to dissipate. The bathroom ventilation system should be operational before the project starts.
Frequently Asked Questions About Bathroom Wall Panels
Most bathroom wall panels are water-resistant or waterproof, but the rating varies by material. Panels intended for shower enclosures must be specifically rated for continuous water exposure. Always verify the manufacturer’s specifications for wet area use before installing panels in showers.
Quality wall panels last 15 to 25 years with proper installation and maintenance. Acrylic and solid surface panels typically outlast PVC. The lifespan depends on material quality, installation quality, and how well the bathroom is ventilated.
Some panel systems can be installed over existing tile if the tile is sound, well-adhered, and the surface is flat. However, this adds thickness that affects fixture placement and may create transition issues with adjacent surfaces. Removing old tile and starting with a clean substrate usually produces better results.
Quality wall panel installations in bathrooms add value by improving appearance and reducing maintenance concerns. High-end materials like solid surface or glass have better resale impact than budget PVC. The value added depends on material choice, installation quality, and overall bathroom design.
Most panels clean with mild soap and water or non-abrasive bathroom cleaners. Avoid abrasive scrubbers that scratch the surface. Acrylic panels may require special acrylic cleaners to prevent clouding. Always follow the manufacturer’s cleaning recommendations for your specific panel material.
Minor scratches in solid surface panels can be sanded out. Acrylic panels can sometimes be polished to reduce scratches. Deep damage, cracks, or holes usually require panel replacement. Unlike tile where individual pieces can be replaced, damaged panels typically need full section replacement.
Acrylic and solid surface panels perform best in shower enclosures due to their seamless installation, durability, and resistance to mold and mildew. These materials are specifically engineered for wet environments and maintain their appearance under daily shower use.
A typical bathroom wall panel installation takes 1 to 3 days depending on bathroom size, layout complexity, and substrate preparation needs. Simple installations in small bathrooms with good existing walls may be completed in a single day. Complex layouts or repairs add time.
DIY installation is possible for experienced homeowners with proper tools and attention to detail. However, mistakes are costly since panels cannot be easily adjusted after cutting. Professional installation ensures proper waterproofing, clean joints, and warranty compliance. Consider your skill level and the complexity of your bathroom layout before deciding.
Wall panels are compatible with underfloor heating systems. The panels do not interfere with floor heating, and the warm floor can help reduce moisture and condensation on wall surfaces. Ensure proper ventilation is maintained to prevent humidity buildup in the bathroom.